Tuesday, April 14, 2009

Moleskine Wallet

Another day, another wallet. One day I'll get it together and put all these in my Etsy store, and that day will be soon. I need someone more graphics literate that me (Jeff, I'm looking in your direction) to make a banner for my shop and design my business cards. And I need to get some of those sweet personalized tags for all the things I make. Somewhere in there I may reconsider my business name as well. I've used Sugar Plum Creations as the default for a while. I like it, but it may be time for something new. If you have any suggestions, tell me.

This little gem holds a Moleskine Cahier pocket sized notebook on one side and all your cash money on the other side. I also put in the zippered change pouch and 4 card slots. It closes with velcro. My notebook is modeling the wallet here. If you look close you can read my "music I need to have" list. I was thinking about a little pen loop too, but that would've thrown off the proportions of the whole thing and isn't everything really about the right proportions?


Monday, April 13, 2009

Spats

I became completely and utterly obsessed with spats back in the fall. I absolutely HAD to have a pair. I saw some on etsy, but they were a little too pricey and not exactly the same as the picture in my head, so I decided to give it a go myself.

This is how they came to be, in brief. Firstly I made a rough pattern from the shaft (haha, I said "shaft") portion of a pair of zippered boots. I then made a few muslins from that pattern until I had the fit just right. Then I cut out the vinyl and the lining, stenciled the bird image on the vinyl. I stitched the lining and the vinyl, stiched them together, flipped and top stitched. Then I came to a stand still. I'd originally pictured eyelets, which I can do on my sewing machine, but once the spats were constructed, I realized I wanted something more substantial, which is when I decided on grommets. Except I didn't have a grommet setter. I went to the craft store and they only had little grommets. I ended up going to Tandy Leather and getting a heavy duty grommet setter and mallot. Then I marked and precut the holes and pounded in the grommets. It wasn't hard, but it was time consuming and VERY loud. They lace up with some plaid vintage ribbon from my stash.


And in case you didn't notice, yes the wallet and the spats match.

Vegan Wallets

So, it's been a while, eh? Yeah, that happens sometimes. A few things happened and I was busy. But then I made some more stuff that I really liked and a few people started asking me why I wasn't blogging anymore and that's all, and now I'm back, and how!

See, this store opened up very close to my house. This store right here. It's literally two blocks away. I love it. They've got a great remnant room, lots of fabrics for $2.99/yard. The guy knows me by now, I walk in and he tells me about the new stuff in "the room" as he puts it. I picked up some nice vinyl there, medium weight, and nice texture in a few colors. And he's got a bolt of faux ostrich and I made him promise to call me when he had a remnant of that, I can't wait. They've also got tons of upholstery weight cottons and drapery silks, if you're into that kind of thing. I did get some raw silk in a great shade of green and turned it into a scarf with a purple jellyfish stencil, but that's another post for another day. Today's post is about wallets.

First, I made myself a checkbook folio based off of this tutorial. And I can't say enough great things about that tutorial. Very clear, and straightforward, the pictures are great and the instructions are VERY easy to follow. I was slightly intimidated by the zipper, but I got it on the first try, which rocks. The pattern on that site is probably suitable for an intermediate sewer, but if you omit the zipper pouch, it would be a lot easier. I made two modifications. As one of the last steps I topstitched a line down to seperate the two long pockets. It just seemed like the lining material would stay flatter that way. And I used a velcro closure instead of the snap, because I had velcro on hand already.


Then I was showing off my new wallet to my BFF and he wanted one, "just like that, but different". He doesn't carry checks and wanted something that would fit in his pocket. Or something. So I made this little one. This was much easier since I didn't have to do a zipper.


Thursday, November 13, 2008

Well, shucks

I failed miserably last night. Total craft meltdown. And it was my own fault for lack of planning and foresight. But at least I've come out of the ordeal having learned a valuable lesson.

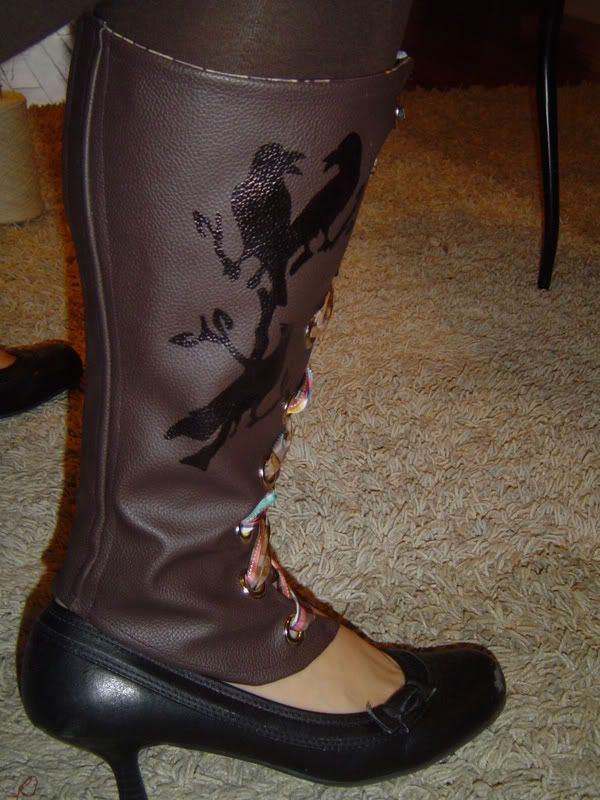
The idea, my friends, was to construct a monochromatic black-on-black handbag. With emphasis on different textures, not colors. The bag in my head is a fairly sizable, structured black wool handbag, with two straps, and a large black raven appliqued on the side. So with very little planning I jumped in with both feet.

I found a few raven pictures, for reference, made a stencil, cut the raven from black vinyl. So far so good. Then I realized that the piece of wool I thought I had in my stash was half the size I remembered it being. I have no idea what I used the other half for, but it was gone. Since I'm an impatient person, I decided to move forward anyway. I stitched the raven to the wool with a nice metallic silver embroidery floss. And I've got to say, that looked great. And then I realized just how small this bag was going to be, but again, being either impatient, or just plain dumb, I moved on.

First problem: I tried to make my own straps. I used long lengths of vinyl and my machine just kept eating it. Even after I adjusted tension and blah blah blah, I just couldn't get it to feed right, but eventually I got something that could pass for a strap and moved on.

Second problem: I didn't use interfacing on the lining material. This made the lining way too light for the wool on the outside. I couldn't get the corners to lay down. It looked like a bag of cereal inside the box instead of a structed purse.

Third problem: The proportions were WAY off. Once i'd sewed the thing together and made the corners it was about 6" tall by 5" wide and 3" deep. WTF? Who was I kidding?

It was at this point that I realized I needed to stop, it was just ridiculous. The wool was to heavy, the cotton was to light and the vinyl was puckered. And on top of that the shape and scale was all wrong. Nothing at all like the picture I had in my head. But there is hope, I've formed a new plan. A new plan which involves a vogue hand bag pattern, store bought straps, much more fabric, a lot of interfacing, and then finally a raven applique. The lesson learned is the bones of a thing is way more important than the shiny you slap on it.

Monday, November 10, 2008

Birthday Crown

Bowie's birthday party was this Saturday and true to form, I was pulling out supplies to make this about two hours before the party started. Luckily, it was a quick craft. I'd been thinking about making him a birthday crown for about a week, but was originally thinking about felted wool. When I pulled out my stash o' fabric I found that I didn't have a big enough piece of felt and I didn't feel like taking the time to piece something together. I was about to give up entirely, when I remembered the remnant of chalk board vinyl I picked up from
Fleur Fabrics, an awesome local sewing lounge. If you live in the RVA, I strongly suggest heading down there for a look-see. They've got great vintage remnants, buttons, ribbons, patterns as well as new fabrics, eco-friendly stuff and Amy Butler (if you go in for that). Continued digging in the stash turned up some graphic black and white print fabric for the lining. I used a heavy weight fusible interfacing on the lining fabric and since I used interfacing I decided to just topstitch.

To sidetrack just a little, I wasn't entirely sold on the chalkboard vinyl, so I only got a remnant when I saw it at the store. I initially thought the chalk wouldn't write well or it would get cloudy after repeated use, but I'm glad to report I was dead wrong. The stuff works great and is very easy to sew.

I made a quick pattern on a piece of 8x11 paper turned sideways, which gave me an overall length of 22 inches since I only topstitched. The highest point in the middle is 5 inches and the two smaller points on each side are 4 inches, the band in the back is 2.5 inches. I just plotted the tops and bottoms of the peaks and free-handed the curves. I used velcro on the back so it is adjustable from about 20-22 inches.

Obviously the best part about this is the ability to write, then erase, anything you want on the crown. I made it for his birthday party, and just wrote his name on it, but he can use it for all kinds of pretend games and write on it whatever he wants. I love the idea of one item with multiple uses, especially for kids, it really frees the imagination.


Thursday, November 6, 2008

Denim Skirt with "Kicky Things"

Anika requested that I make her a "skirt from jeans with kicky things". And oddly enough, I knew pretty much exactly what she was talking about without even having to think too much. Unfortunately I'd just gone through my fabric stash about a week before to donate textile items to the Art program at her school, so what I was left with were some very oddly shaped pieces of denim fabric from an a-line skirt I'd made myself.

I got pretty lazy on the construction, so the top is basically a tube with elastic casing at the top and asymetrical hem on the bottom. Then I made pleats in little pieces of scrap material and sewed them right onto the bottom to achieve "kicky things". I didn't bother hemming the edges because I'm pretty sure that Anika wanted the deconstucted, frayed look. The bright pink thread was her idea and I added the decorative leaf stitch and she LOVED it. Five year olds are pretty easy to please.


Monday, November 3, 2008

November Waves Capelet

Three things are true:
1. I have way too much stash yarn
2. I enjoy the word "capelet"
3. I covet everything at this etsy shop

Last week, before I went to the laundrette, I threw all my yarn onto the floor. Then I stood back and squinted and moved stuff around, mostly with my feet while I drank coffee. Then I left it alone while I gathered up laundry. Only then did I realize how late it was getting so I grabbed all the yarn I had in shades of green, teal, and brown and threw it in a bag with my crochet hooks and walked out the door.

Once I had the wash started I evaluated what I'd brought along. I had two balls of Cascade 220, teal and something that my dad would call "smooshed catepillar green" (and for the record, I think he's right), I also had a few balls some undentified superwash wool fingering weight in a dark chocolate and another three balls of fingering weight cotton chenille, one in khaki, one bark brown and one varigated with shades of green, teal, and brown. I decided immediately to hold them all together as I worked because I dug on the color combination, it reminds me of waves on the Chesapeake Bay in November, and I wanted this project to go real quick.

I fished three crochet hooks out of my bag, 11.5 mm, 13mm, and something emberassingly big that lacked a marking. I started with the 11.5 mm hook and made a chain that comfortably wrapped around my neck with a little overlap. Then I did two rows of double crochet with that same hook, switched to the larger hook, did a few increases at the beginning of each row and at the same time switched to triple crochet, and then switched to the largest hook, did a few more increases and a few more rows of triple crochet until the whole shebang was long enough to cover my shoulders. Then I moved back up to the top and did two rows of v-stitch on the other side of the foundation chain with the 11.5 mm hook. And somewhere in there I moved the laundry to the dryer, talked to my BF on the phone, got some coffee, played ball with the kids, and made lunch. The next day I dug through my stash for some buttons and sewed them on.

After I wore it the first time I noticed that the bottom edge got flipped up and under sometimes or didn't fall exactly right. I figured it was because there wasn't enough weight at the bottom so that night I added single crochet border all the way around and a shell border on the bottom edge. I only used three of the original six yarns because I wanted a slight color variation.


Thanks to Anika for helping model.